
Animating a character walking is one of the fundamental skills in animation, whether you’re a beginner or an experienced animator.
A well-executed walk cycle can breathe life into your character, making them feel more dynamic and engaging. This guide will take you through the step-by-step process of animating a character walking using basic tools, ensuring clarity, accessibility, and ease of execution.
Understanding a walk cycle is crucial, as it forms the backbone of movement in animation. Whether you’re animating a simple stick figure or a fully detailed character, mastering this skill will improve your ability to animate more complex actions like running, jumping, and interacting with environments. A walk cycle is the first step toward creating smooth, believable motion in animation.
Understanding the Basics of a Walk Cycle
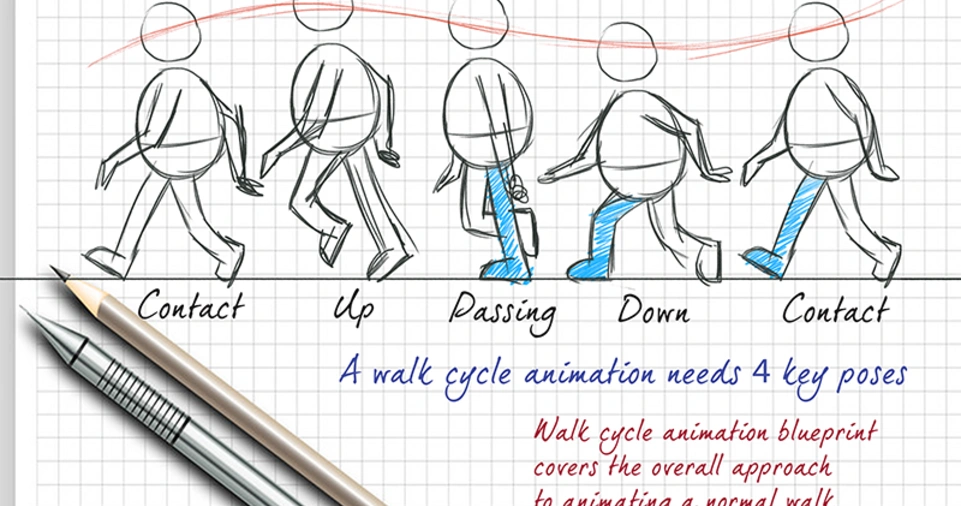
Before diving into the animation process, it’s essential to understand the four key positions in a walk cycle:
Contact Position – When one foot is in front and the other is behind, touching the ground. This is the starting and ending position of a walk cycle.
Down Position – When the character’s body lowers as they transfer weight, causing the supporting leg to bend slightly.
Passing Position – When the back foot lifts and moves forward while the other remains on the ground, signaling the halfway point in the cycle.
Up Position – When the character’s body rises, preparing for the next step, with the heel of the front foot starting to lift.
A typical walk cycle consists of 8-12 frames for a smooth and natural movement. By tweaking these frames, you can create different walking styles, such as a slow, heavy walk or a fast, energetic stride.
Tools You Can Use
Even with basic tools, you can achieve a high-quality walk cycle animation. Here are some tools suitable for beginners:
| Tool | Type | Best For |
|---|---|---|
| Pencil & Paper | Traditional | Sketching frame-by-frame animations manually |
| Adobe Animate | Digital | 2D vector-based animation |
| Krita | Digital (Free) | Hand-drawn animation with onion-skinning |
| Blender | Digital (Free) | 3D character animation |
| Stop Motion Studio | Traditional/Digital | Stop motion animation using physical models |
| Synfig Studio | Digital (Free) | 2D vector-based animation with timeline tools |
ALSO READ:How to Animate Without Fancy Software: Tips for DIY Animators
Step-by-Step Guide to Animating a Walk Cycle
Sketch the Key Poses
Start by drawing the four key positions mentioned earlier. If you’re using digital tools, use onion-skinning to track previous frames. For traditional methods, flipping pages or using a lightbox helps maintain consistency. Ensure that the character’s height and proportions remain consistent across frames.
Add In-Between Frames
To create smoother motion, add in-between frames between key poses. These will bridge the gap and ensure a fluid movement. For example, adding more in-between frames can create a slower, more relaxed walk, while fewer frames will create a snappier, more energetic movement.
Focus on Timing and Spacing
- Ensure consistent timing by keeping even spacing between frames.
- Use slow-in and slow-out to add a natural feel.
- A basic walk cycle typically follows 12 frames per second (fps) for smooth animation.
- Vary the spacing slightly to add character and personality to the walk.
Animate Secondary Movements
To make your animation more lively:
- Add slight head bobbing and arm swinging.
- Ensure the hips and shoulders move oppositely for a natural effect.
- Keep movement fluid and not robotic.
- Adjust the speed of different body parts to emphasize weight shifts.
- Add slight movements to the character’s clothing or hair for extra realism.
Clean Up and Refine
- Remove any unnecessary sketches or guidelines.
- Adjust the spacing if the walk appears too fast or too slow.
- Check for consistency in foot placement and movement arcs.
- Review the animation from multiple angles if working in 3D.
- Make final tweaks by refining line work and adjusting small details like toe lift-off.
ALSO READ: Introduction to Simple Animation Apps for Beginners
Common Mistakes and How to Fix Them
| Mistake | Solution |
|---|---|
| Feet sliding unnaturally | Ensure feet stay in place on the ground contact |
| Stiff upper body | Add secondary motion like head bobbing |
| Unnatural arm swing | Arms should move opposite to the legs |
| Timing inconsistencies | Use a reference video or stick to standard fps |
| Lack of weight distribution | Ensure hips and shoulders counterbalance |
| Too many or too few frames | Adjust the number of frames for natural motion |
Practical Tips for Beginners
- Use reference videos: Observing real-life walking helps refine animation.
- Start with simple stick figures before adding details.
- Experiment with different speeds and styles, such as slow-motion walks or energetic strides.
- Use a mirror to act out your character’s walk and study natural movements.
- Break down the movement: Focus on one part of the body at a time.
- Play with exaggeration: A cartoon-style walk may require exaggerated hip and arm swings.
- Consider the personality of the character: A confident walk will differ from a timid one.
Conclusion
Mastering a walk cycle is a crucial step in animation, helping you develop fundamental skills applicable to more complex movements. Whether you’re using pencil and paper or digital software, the key is practice and observation. By studying reference materials and tweaking the timing and spacing, you can create a unique and expressive walk for any character.
Now that you have the basics, why not start animating your own character? Share your progress, experiment with different walking styles, and refine your technique with every new project. Keep practicing, and soon, you’ll be animating walks with confidence!